Wednesday, November 27, 2013

Anime Club: Anime Thanksgiving!

As a lover of holidays and a big fan of using themes in my programming, I decided to try an Anime Thanksgiving meal for my club meeting this past week. Yes, I know Thanksgiving isn't a Japanese holiday, but I couldn't think of a more appropriate name for the program. I set up buffet-style tables and let the teens try different kinds of Japanese/Asian dishes as we watched some anime. Here's what we ate:

1.Yakisoba: You can absolutely try to make it from scratch. But I'll admit that I cheated and found these kits from Maruchan at the grocery store. It should either be in the Asian foods or the soup aisle by the ramen noodles. These were easy because all you have to do is add water and microwave them. I purchases the roast chicken flavor. I also set out forks and of course, chopsticks that I found in bulk at my local Asian market.

2. California Roll Sushi: I picked up some California Roll sushi from my local grocery store. I figured that this is a good starter sushi to let my teens eat, especially for the ones who have never tried sushi before. There's nothing to scary or adventurous inside - just avocado, crabmeat, and cucumber. 

3. Soy Sauce: I set out some soy sauce and little cups in case the teens wanted to dip their sushi/or yakisoba in it.

4. Miso Soup: I'll admit that I cheated with this one too. You absolutely can make your own if you like. But I'm lucky enough to have a Japanese restaurant very nearby and purchased 3 quarts of soup from them.

5. Anko Paste Buns: All you need for these are cans of anko paste (red bean paste purchased from my local Asian market), dinner rolls (I used Sweet Hawaiian rolls to add some more sweetness), whipped cream, and cherries/orange slices. You cut the buns in the middle and fill it with the anko paste. Then add some whipped cream on top and a cherry or orange slice. This was our dessert. I got the recipe from The Manga Cookbook, which gave me lots of good ideas for future recipes!


6. Bubble Tea: Also called Boba Tea. I found an easy recipe here. I brewed some black tea in a pot over the stove. I used a 4 quart pot and added 15 tea bags. Next time, I would use more tea bags since it will end up getting more diluted with cold water. I had also cooked the tapioca pearls the night before at home and refrigerated them. I wouldn't really recommend this because they ended up hardening again and just stuck together in one mass lump. Cook them the day of the program if you can. I set out cups, straws, the tapioca, the tea, ice, and sweetened condensed milk and let the teens make their own bubble tea to taste. 

Please excuse the messy kitchen!

How It Went:

Overall, the teens loved the food. I had a mom call afterwards asking for the miso soup recipe! By far, their favorite dish was the yakisoba. They also liked the sushi and the soup. The anko paste buns were a little weird for them. Some clever teens took the soy sauce cups and put whipped cream and cherries in them to make their own dessert. One younger teen would only eat whipped cream in a bowl! Some were leery about the tapioca pearls, but most brave souls tried them anyway. This was a prep-intensive but very fun program that I would definitely do again.

Tuesday, November 19, 2013

NOON Year's Eve Party

As the end of 2013 is fast approaching (yikes!), some libraries are planning celebrations to ring 2014. Last year, I wanted to try a NOON Year's Eve program for families and it ended up being a huge hit! Over 100 people attended and had a ball. I held it from 11:00 a.m. to Noon on New Year's Eve Day. I didn't do registration (though I might require it next time) and it was open to all ages with their families. I purchased some New Year's decorations from the local party store in order to liven up the room. Here's what we did:


As the families filed in, I had them sit on the floor and I read The Night Before New Year's by Natasha Wing. This allowed the kids to get settled as well as any latecomers to join us.


After the story, I briefly explained what to do at each station. Most were self-directed and I included directions inside acrylic sign-holders at each table. These were the stations:

  1. Resolutions Craft: I cut out some book-shaped Ellison dies in both blue and white, set out markers, and asked the kids to write down their New Year's resolutions. Then after the program, I hung them all up in the Children's Room.
  2. Party Hats: Because no party is complete without a hat, I bought cheap party hats in bulk, set out stickers, and let the kids use their imaginations when decorating.
  3. Noisemakers/Shakers: This was by far the most popular station. I bought clear party cups from the grocery store and set out various beads and beans. The kids filled one of the cups halfway with the beans/beads, put another clear cup on top, and sealed the middle with packing tape. I also had a table to make noisemakers out of toilet paper tubes. Kids decorated yellow construction paper to glue around the tube. Then they took a square of a wax paper and rubber banded it around one end. They could then blow into the other end and make some noise! We then used these during our balloon drop.
  4. Time Capsules: I purchased some clear food storage containers in bulk with lids. These served as the capsule itself. I made this lid template where they could set the year that they wanted to open it. I also had them complete the last page on this PDF, the first page of this PDF and this crystal ball worksheet. I explained that when they got home they could add anything else they wanted to the capsule before they hid it somewhere.
  5. Line Dancing: I found some kids line dancing CDs and danced the Hokey Pokey and the Macarena among others. It was a blast!
  6. Snack: I served apple juice and cupcakes with "confetti" sprinkles for a treat.
  7. Balloon Pop/Drop: I had to experiment with this a bit to find the right supplies for maximum impact. I ended up purchasing these balloons on Amazon. Really, any large clear balloon would work though. I then filled 2 balloons with tissue paper squares and confetti. I hung them from the ceiling with fishing line. I stood on a chair with a pair of scissors and we counted down to noon together. At noon exactly, I popped the balloons and put on the song "Auld Lang Syne".
Happy NOON Year!

Have you done a Noon Year's Eve program? What did you do?

Thursday, November 14, 2013

Anime Club: Manga Bookmarks, Shrinky Dinks, and How Less Is More

When it comes to my group of anime teens and planning club activities, I have one motto: SIMPLIFY. When I first formed my club, I had champagne dreams with diet coke time and money. I went crazy pinning and created an entire Pinterest board to anime club ideas. One month, I really wanted to try block printing/stamp art. So I went out an ordered those Styrofoam takeout containers in bulk and spent an entire afternoon cutting off the tops to use as the stamp base. I went to the craft store and agonized about what color paint to buy (I settled on a unisex-friendly red). I spent my off-desk time experimenting with different paint brushes and which one would coat the stamp evenly. (I ended up with a mix of foam paint brushes and cheap foam paint rollers for those who want to try this craft.) Set-up the day of the program took me a good 45 minutes. I was so excited to do this awesome, elaborate craft with my anime teens, I thought for sure we would end up with stamps like this:


When the teens arrived for the meeting, I excitedly explained how to make the stamps. Then I put on some Black Butler and let them grab a snack. By the end of the meeting, I noticed that hardly any of the teens had completed the craft! When I asked if they like the activity, the said yes but they had gotten so distracted by the anime and just hanging out that they had forgotten about it! So much for all of my planning...

I learned a valuable lesson that day with my anime club: less is more. I had put all of this time and effort into an activity when really all they wanted was to get together and hang out and have a snack.

So after learning my lesson the hard way, I decided to try a less prep-intensive craft - manga bookmarks!

I had recently completed some weeding in my teen manga section and had a pile of older titles that I needed to do something with. Thanks to some inspiration from Pinterest, I decided to let the teens turn them into bookmarks.

Here's all you need:
My example.
  • Old manga to cut/tear up
  • Black cardstock cut into bookmark-sized pieces
  • Hold punches
  • Scissors
  • Glue sticks
  • Embroidery floss or ribbon for tassels (optional)
  • Mod Podge to seal the bookmarks (optional - I didn't do this)
I set up a table with the manga and craft supplies in the back of the room. Then I briefly explained how to make the bookmarks and let them go. A lot of them asked if they could just take the manga home! It was a very easy and fun program to do.

Another fun and easy craft that I did last year were Shrinky Dink keychains. All you need for that is the following:
  • Shrinky Dink paper - (I used white glossy). Shrinky Dinks shrink to about 1/3 of their size so I estimated how small the pieces needed to be to be a good key chain size. Cutting the pieces of paper into fourths seemed work well.
  • Key chain rings - I found these at my local craft store in the jewelry-making aisle.
  • Sharpie markers - These work the best for coloring on the Shrinky Dink paper
  • Access to an oven/toaster oven - Because the instructions included with the Shrinky Dink paper give you a range for oven temperature, I made sure to test out a couple before the program. 
  • Scissors - I had some scissors available so the teens could cut out their design.
  • Hole punches
  • Jump rings - You can purchase these cheaply and in bulk from your local craft store.
  • Jewelry pliers - I bought several sets of cheap jewelry pliers from Amazon since I use them every month for my Book Club craft. You can also send out a staff email asking people to loan you theirs for the program.
My non-anime related example.

This activity was also a hit. As the teens completed their designs, they brought them up to me and when the cookie sheet was full, I baked a batch. I also gave them a warning near the end of the program since they do take time to bake. Again, very little prep and lots of payoff!

What other craft/activity ideas would you recommend for anime club?


Wednesday, November 13, 2013

On Being a Rock Star

From: zazzle.com
As I've starting to become more involved in ALA (through both attending conferences and committee work) I've gotten to meet so many awesome librarians from all around the country. I trade business cards with some of them and then go back home to Ohio to check out their websites and blogs, many of which I now follow religiously. I borrow from their wisdom and experience to make myself a better librarian, but in turn I find myself feeling like I'm not good enough. Whether that means I need to blog more, do more, be more. I sometimes feel like I just won't ever measure up to these rock stars.

And then I stumbled across this post by Cory Eckert on Storytime Underground. If you haven't seen it yet, please drop everything you are doing and go read it. Seriously. I'll wait.

This hit the nail on the head for me. I had a serious case of imposter syndrome. I see all of these amazing librarians out there doing amazing things and I want to be at their caliber of amazing-ness.

But then I read Cory's post and it drove the point home for me that to my community, I am a rock star. I see it with every toddler hug I receive. I see it when my book club teens stay after our discussions to chat about Minecraft. I see it when I somehow manage to find the perfect book for that reluctant reader.

Ingrid over at the Magpie Librarian also imparted her words of wisdom on this topic. She spoke about the librarians in the trenches - the ones who need to be there on the front lines to handle patron issues and put together the book orders. You know, the ones with the "less-then-glamorous" tasks. She struck a chord with the point that sometimes we struggle so much trying to keep on top of our every day tasks that it makes it hard for us to do the big shiny projects that can get us noticed. However, that doesn't make the minutiae any less important. That person manning the reference desk at 8:00 p.m. on a Monday night that helps that patron find the book due tomorrow for a homework assignment is every bit as important.

We are the tellers of stories, the advisers of reading, the inventors of programming. We do everything from make crafts out of paper plates to finding primary sources on World War II and everything in between.

We are jacks of all trades. We are youth services librarians and we are all rock stars.

Monday, November 11, 2013

Storytime - Counting

The Plan:

Books: 


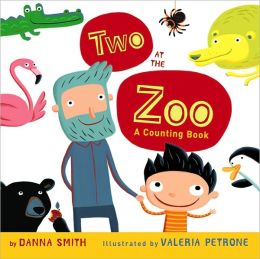
Two at the Zoo: A Counting Book by Danna Smith
Pete the Cat and His Four Groovy Buttons by Eric Litwin

Two at the Zoo is a great book to use with toddlers (and preschoolers) because it has a nice rhythm and rhyme when reading aloud. I also had the kids count along with me on each of the pages.

Because I love the Pete the Cat books so much, I decided to go gung-ho and make a flannel out of it. Let me just say that it was a huge hit with the kids! Definitely worth the extra effort of making his coat open to show his belly button. (A special thanks to Storytiming for the flannel instructions!)


Songs/Rhymes:

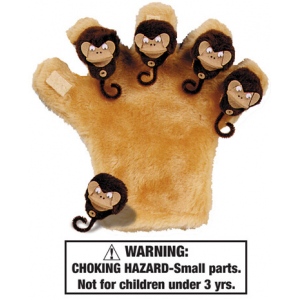
"Five Little Monkeys" (w/ Monkey Mitt)

Five little monkeys jumping on the bed.
One fell off and bumped his head.
Mama called the doctor and the doctor said,
"No more monkeys jumping on the bed!"

(Continue with 4,3,2, and 1)


"Five Funny Dinosaurs" (w/ flannel)
(To the tune: Five Green and Speckled Frogs)

Five funny dinosaurs
Let out a great big ROAR!
And ate up some most delicious leaves,
YUM! YUM!
One jumped into the pool
Where it was nice and cool.
Now there are four funny dinosaurs.
ROAR! ROAR!

(Continue with 4,3,2, and 1)

I did not make this awesome flannel. Though I wish I had!


Storytime - Halloween

I know this is late in coming for this season, but hopefully it will be useful next year!

The Plan:

Books:


Plumply, Dumply Pumpkin by Mary Serfozo

I also did a cut-and-tell story called The Little Orange House. You take an orange piece of construction paper and a pair of scissors and cut as you tell the story. This one is neat because the surprise at the end is...spoilers...it looks like a jack o' lantern! This one got a lot of gasps from my storytime crowd. You can find the full story here.

Songs/Rhymes:

"Five Little Pumpkins" (w/ flannel)

Five little pumpkins sitting on the gate. (hold up fingers)
The first one said, "My, it's getting late!"
The second one said, "There are witches in the air."
The third one said, "I don't care!"
The fourth one said, "Let's run and run and run."
The fifth one said, "It's Halloween fun!"
Then "oooooh" went the wind, (cup mouth with hands and say, oooooh)
And out went the light. (clap on the word "out")
And the five little pumpkins rolled out of sight. (roll hands)


"The Halloween-y Spider"
(To the tune: "Itsy Bitsy Spider")

The Halloween-y spider crawled in the witch's house. (make spider with hands and crawl them up)
In came the witch and swept the spider out. (make arm fly in like a broom and then sweep hands out)
Out came the moon and she rode off on her broom. (make a moon with arms and make arm fly like a broom again)
And the Halloween-y spider crawled in her house again! (make spider with hands and crawl them up again)

Snack:

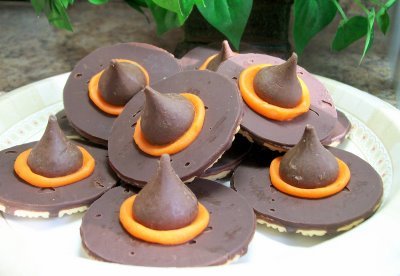
I found a really cute idea for witch's hats on Pinterest. You just take a Fudge Stripe cookie and a Hershey Kiss and use some orange frosting to glue them together. Then you can add a bow with candy corn. Super cute!

Flowers and Glitter Glue: Rainbow Magic at the Library!

From: https://www.hachettechildrens.co.uk
After doing many a science and video gaming program as of late (which, by the way, are good!) I decided that I needed to be girly and host a program with lots of sparkles and color. The Rainbow Magic Fairies book series by Daisy Meadows are extremely popular at my library, so I decided to host a party around them!

I decided to open the program to all ages with their families and to not require registration. If I did this again, I would probably limit the program to ages 3 and up and ask people to register ahead of time. I had no idea how many to expect at the program and ended up with 163 people in attendance! Luckily, I had planned for 100 kids and had enough craft supplies.

At the start of the program, I read one of the Rainbow Fairy easy readers. It was the perfect length to get into the mood for the program and allowed any latecomers time to arrive and get settled in. After the story since I had a rapt audience, I explained each of the craft stations/activities:

1. Rainbow Fairies Scavenger Hunt: In each of the books, Jack Frost hides an object pertaining to that Rainbow Fairy. Another librarian was nice enough to share her scavenger hunt so all I had to do was tweak her handout. I printed out small pictures of each object and hid them around the meeting room. The kids then had the entire duration of the program to find and check off the objects. When they were done, they showed me their sheets and they received a Pixy Stick as a prize.

2. Door Hangers: I found this door hanger craft from the Rainbow Magic website. I printed out 2 different designs on regular paper (though you could do card stock if you like), set out some crayons, scissors, and glue sticks, and instant craft!


3. Fairy Wands: I purchased some foam stars and cheap rolls of ribbon from my local craft store. I used clear straws for the wand handles and packing tape to stick the straw and ribbon to the stars. Kids could then decorate their wands with glitter glue. (One caveat: I was in a hurry and didn't cover the tables for this craft. Glitter glue is extremely difficult to remove from tabletops once it dries.)


4. Clothespin Fairy Dolls: The instructions that I used can be found here. Instead of paint I set out magic markers and they worked just fine.


5. Fairy Flower Crowns: I found some 1/2" white headbands in bulk from Amazon. I then purchased a bunch of silk flowers and 1" silk ribbon from my local craft store. I set out some jewelry wire cutters to cut the stems and scotch tape to attach the flowers to the headbands. Then the kids could wrap the ribbons around the headbands and seal both ends with more scotch tape. This was by far the most expensive, most difficult, and most popular craft at the party. I highly recommend it. I also recommend having a volunteer or staff member man this station to help parents figure this craft out. Everyone's crown turned out lovely. It was so worth it! (Thanks to the Derry Public Library for the idea!)


6. Fairy Snack: Of course no party would be complete without refreshments. I offered up cups of pink lemonade and M&M cookies for a snack.

All in all, the program was a huge success. I would do it again in a heartbeat!

For more fairy craft/activity ideas, check out my Pinterest board.


ShareThis